
An AFR above 55 after sizing suggests a leak large enough to find either visually, with a pressure tester, or by process of elimination.
Steps:
1. Locate the leak visually.
Run an inspection mist cycle and walk the nozzle circuit while it is misting. Look for a noticeable difference in mist intensity between adjacent nozzles, or sections misting poorly or not at all. This is the most direct indication of a leak being present.
2. Segment nozzle circuit branches if the leak still isn’t visible.
If there’s no obvious visual difference in performance between nozzles:
-
- Choose a branch or section to temporarily remove for testing and block it off with a plug.
- Adjust the controller’s nozzle count (NOZ) down by the number of nozzles on the plugged branch, so it matches the actively misting nozzle count, otherwise the test will be inaccurate.
- Run a manual mist cycle and compare the AFR to the original baseline:
- If AFR dropped, the leak is in the removed branch.
- If the change is minimal (less than 5) or none, that branch is not the source. Re-add it and test the next branch.
- Once a leaking branch is identified, re-add it, run an inspection mist, and fix the leak(s) found. Reset the controller’s nozzle count back to normal after this process is completed.
3. Replace underground tubing with above-ground tubing if the leak is in a buried section.
Buried tubing is hard to inspect visually and a common source of hidden leaks. Even when buried deep underground, root growth and other elements can cause to the destruction of buried tubing.
-
- Choose a section of underground tubing and disconnect it from the circuit at each end that it is above ground.
- Run a temporary line of above-ground tubing in its place.
- Run a manual mist cycle and compare the AFR to baseline:
- If AFR dropped, the leak is in that buried section.
- If the change is minimal or none, a different buried section is the likely source, repeat with another buried run.
- Once identified, either replace the underground tubing, or for a temporary fix, leave the above ground tubing in place until time can be made for the buried tubing replacement.
- This approach works best when only a small amount of the circuit is underground; for extensively buried circuits, prioritize the pressure-tester and branch-segmentation steps first.
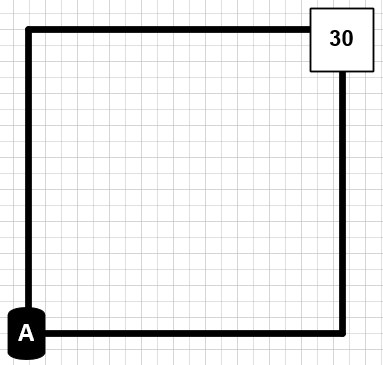
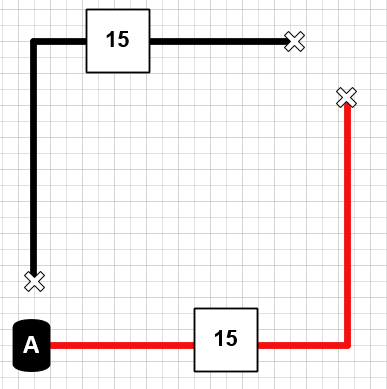
Break the loop and isolate one branch of the circuit. Adjust the NOZ count to match the new branch and test again.
4. Fix and confirm.
Repair any leaking tubing or fittings found, then run a manual mist cycle (hold Up + Down together) and compare the new AFR to baseline. There should be a noticeable drop in the AFR compared to the previous higher reading.
5. Repeat as needed.
If Error 3 occurs again after the fix, the circuit likely has more than one leak. Repeat the visual/pressure-tester check until Error 3 no longer appears and mist intensity looks normal across all nozzles.